If you are staying at home for this year's vacation, you will most probably be looking for ideas to keep the family entertained. One easy way is to set up a home cinema in the garden. It doesn’t have to be expensive and best of all, you’ll get to choose what film to watch. Here's a guide and an easy DIY:

1. Find your location
When setting up your outdoor cinema, make sure your garden is dry and sheltered from the wind.
2. Make your guests feel welcome
Just make sure everyone has a good view, and keep a few blankets aside or perhaps light a fire pit in case it gets chilly later on.
3. Prepare snacks
Pour popcorn into bowls, and filling a bucket with ice and stocking with bottled drinks, so all you have to do is reach down for a refill.
This DIY home cinema is easy enough to set up and the family can sit back and relax for an evening at the movies - in the garden.

You will need:
7 of 44 x 44 x 3000mm PAR pine
1 of 44 x 44 x 1800 PAR pine
Paracord or nylon cord, 10 metres
Fabric dropcloth or cotton sheet 220cm x 240cm
Here’s how:
Step 1
Grab [3] of the PAR pine, cut a 3-metre length of nylon cord. Place the [3] beams on top of [2] two other beams. The bottom beams will act as a support. To hold the beams together to form a tripod you will knot the [3] beams as shown in the diagram just underneath the image below.

Step 2
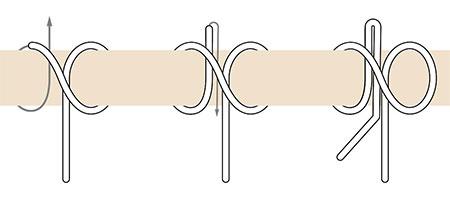
The knot used in this step is called a Timber Hitch and is made by wrapping the cord around [1] of the beams, as shown below. If you want more information on this type of knot, you can visit this link to see a selection of informative videos.

Diagram: Timber Hitch knot

Step 3
To tie all the [3] beams together, thread the cord above and below the [3] beams, alternating back and forth a total o 5 times to ensure a secure tying together.


Step 4
In this step, you will do shear lashing to wrap the cord around the gap between the beams 3 times, as shown above. Now wrap the cord around the centre beam to wind around and back before repeating the shear lashing around the last gap, as shown in the image below.

Step 5
The last knot needed to fix the [3] beam together is known as a Clove Hitch. Ensure that the knot is securely tightened at the end of the nylon cord.

Good to know: Have someone to help set up the three beams that sit at both sides of the movie screen to form a sturdy tripod.
Diagram: Clove Hitch
Step 6
To create the movie screen, sew a pocket along the top and bottom edge of the fabric sheet to allow you to insert the 44 x 4mm pine beams. The easiest way to do this is to peg a white sheet to your washing line. You may want to weigh it down at the bottom so that it doesn’t move around in the breeze.

You could also make your screen by sewing together pieces of blackout lining, which you can buy by the metre. Tack lengths of timber to the top and bottom and attach screw hooks to the top, then hang it over a row of nails on a wall or garden fence, suggests experts.
Step 7
Now, all that you have to do is to hang the screen on top of the [2] tripod at the sides. You will need an extra pair of hands to help you do this.

Want all the latest property news and curated hot property listings sent directly to your inbox? Register for Property24’s Hot Properties, Lifestyle and Weekly Property Trends newsletters or follow us on Twitter, Instagram or Facebook.


